Keeping your car trunk organized can be a challenge, especially for car enthusiasts and DIYers who like to carry essential tools for quick fixes. A cluttered trunk not only makes it difficult to find what you need but can also lead to tools rolling around and getting damaged. This simple DIY project provides an effective solution using a readily available tool pouch to create a practical tool holster for your car trunk.
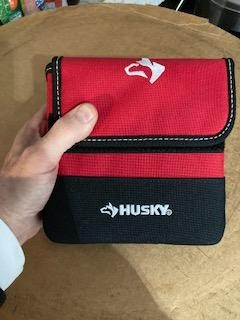
For this project, a Husky 7-inch clip-on tool belt pouch, purchased from Home Depot, serves as the foundation for our trunk tool organizer. This nylon pouch is designed with sturdy, stiff walls that maintain a rectangular shape, offering ample space for storing various small tools. Originally intended to be clipped onto a tool belt, the belt clips and straps on the back are unnecessary for our trunk application and can be easily removed.
The key to a successful trunk tool holster is finding the right location within the trunk. For many vehicles, including the Miata mentioned in the original guide, the raised shelf located in the corner of the trunk presents an often-underutilized space. This area is ideal as it keeps the tools out of the main trunk space while remaining easily accessible. Avoid placing the tool holster in areas already occupied, such as the spare tire compartment or areas needed for larger items.
Securing the tool holster is crucial to prevent it from shifting during driving, especially when cornering. While Velcro may seem like a convenient option, it often lacks the necessary strength for robustly holding a tool pouch in place. A more reliable method involves utilizing existing features within the trunk’s trim. Many cars have push rivets securing the trunk trim, and these can be repurposed to anchor a restraining strap.
An elastic strap, approximately 6 inches in length, offers the perfect solution for securing the tool holster. To install, carefully remove the trunk trim rivets located near your chosen mounting spot. Punch small holes at each end of the elastic strap and align them with the rivet holes in the trunk trim. Then, push the rivets back through the strap and the trim, securing them into their original metal backing. This method creates a strong and discreet anchor point for the tool holster. For added security, you can leave the Velcro on the tool pouch as supplementary fastening, although the rivet and strap method is generally sufficient on its own. Elastic straps are widely available at arts and crafts stores or can be repurposed from existing materials.
By implementing this simple DIY tool holster, you gain a well-organized trunk space where your essential car tools are neatly stored, easily accessible, and prevented from rolling around. This modification is a practical and efficient way to enhance your car’s functionality and ensure you’re always prepared for minor roadside repairs.