A well-equipped USB multi tool can be a lifesaver for car enthusiasts and professionals alike. This comprehensive guide walks you through building a powerful, bootable USB drive packed with diagnostic software, repair utilities, and essential tools to troubleshoot and fix car problems on the go. This guide will help you transform a simple USB drive into a comprehensive diagnostic powerhouse.
Building Your USB Multi Tool: A Step-by-Step Guide
Creating your own custom USB multi tool is easier than you might think. Follow these steps to build a device that caters to your specific needs:
1. Choosing the Right USB Drive
Start with a high-quality USB drive with ample storage. A minimum of 32GB is recommended, but larger capacities (64GB or 128GB) provide more space for multiple diagnostic programs and data storage. Ensure the drive has a fast read/write speed for optimal performance.
2. Setting Up Your Workstation
Create a dedicated working directory on your computer to organize the necessary files and installers. This directory should be backed up regularly to prevent data loss. Remember, the formatting process will erase all data on the USB drive.
3. Organizing Your Tools
Establish a clear folder structure within your working directory. Create folders like “!Setup” for installation files, “!Bootable” for ISO images, and “!Utilities” for portable applications. Prepending “!” ensures these folders appear at the top of your directory listing.
4. Downloading Essential Software
Download the necessary installers for your chosen platforms. Consider including:
-
YUMI (Your Universal Multiboot Installer): This tool creates a multiboot USB drive capable of running various operating systems and diagnostic tools. Download from pendrivelinux.com.
-
PortableApps.com Platform: Provides a suite of portable applications that run directly from the USB drive without installation. Download from portableapps.com.
-
ImageUSB: Facilitates easy duplication of the USB drive’s contents. Download from osforensics.com.
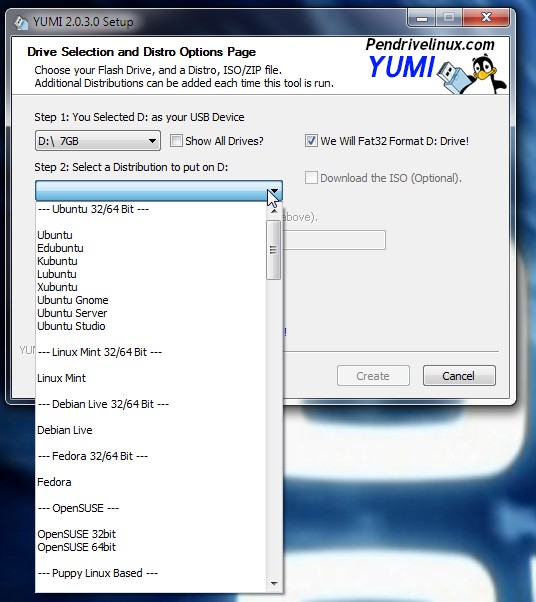
5. Creating the Bootable Environment with YUMI
- Launch YUMI and select your USB drive.
- Check the “Format” option to erase existing data.
- Choose the desired operating system or diagnostic tool from the dropdown menu.
6. Adding Diagnostic Images
- Download ISO images for car diagnostic software and place them in the “!Bootable” folder. Research and select tools compatible with your vehicle’s make and model.
- In YUMI, select the downloaded ISO and click “Create” to add it to the bootable menu.
7. Installing Portable Applications
- Run the PortableApps.com installer and select your USB drive as the installation destination.
- Choose the desired portable applications for tasks like data recovery, file management, and text editing.
8. Adding Other Utilities
Include any additional portable utilities or scripts in the “!Utilities” folder. Examples include:
- Data recovery software: Recuva
- Disk partitioning tools: GParted
- Hardware information utilities: CPU-Z, GPU-Z
9. Finalizing Your USB Multi Tool
- Copy the “!Setup” and “!Utilities” folders to the root of your USB drive.
- Test the bootable environment and ensure all installed applications function correctly.
Conclusion
This comprehensive guide helps you build a versatile Usb Multi Tool For Cars, equipped to handle a wide range of diagnostic and repair tasks. Customize your tool with specific software and utilities to create a personalized solution for your automotive needs. With this powerful tool at your fingertips, you’ll be well-prepared to tackle any automotive challenge. Remember to regularly update your USB multi tool with the latest software versions and new tools as they become available.