
The Tesla Model 3, known for its advanced technology, utilizes a unique diagnostic port. While not a standard OBD2 port, it serves a similar purpose, allowing access to vehicle data. This guide provides a detailed walkthrough on locating and accessing the Model 3’s diagnostic connector.
Locating the diagnostic port is crucial for tasks like using third-party diagnostic tools or performing certain maintenance procedures. This port enables connection to specialized equipment for in-depth vehicle analysis. Before proceeding, it’s critical to ensure the Model 3 is completely shut down, a process that takes approximately 15 minutes and is initiated from the car’s main screen. Failure to do so could result in system errors or potential damage to the vehicle.
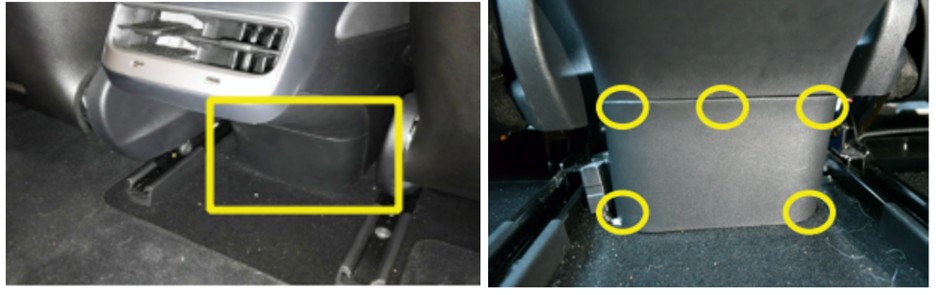
Pinpointing the Tesla Model 3 Diagnostic Port
The diagnostic connector resides within the rear center console, beneath the air vents. Accessing it requires entering the rear passenger area and removing the center console cover. Here’s a step-by-step guide:
Step 1: Prepare for Access
Slide both front seats forward to their maximum extent to allow ample room to work in the rear passenger area.
Step 2: Locate and Release the Console Panel
Identify the small plastic panel at the base of the center console, situated between the front seats. This panel is secured by five push-fit clips. Carefully apply pressure to release these clips. Starting with the bottom right clip is recommended.
Using a small tool, like an Allen wrench or L-shaped screwdriver, can assist in releasing the initial clip. Insert the short end of the tool under the panel’s right edge, rotate it vertically, and gently pull towards you. This action should disengage the bottom right clip.
Step 3: Remove the Console Panel
Once the first clip is released, use your hands to carefully disengage the remaining four clips. Pull the panel towards you to fully remove it.
Step 4: Access the Diagnostic Connector
Inside the console compartment, you’ll find the Tesla Proprietary Diagnostic Connector. This connector is white and has a securing clip. Press the clip and slide it to the left to release the connector.
Step 5: Connect the Diagnostic Cable
With the connector released, you can connect your Tesla diagnostic cable. Ensure proper alignment and a secure connection. The connectors are keyed to prevent incorrect insertion.
After connecting the Tesla diagnostic cable, you can connect your OBDLink dongle and then pair it with a compatible app on your phone or tablet to access vehicle data.
Disclaimer: Connecting any equipment to your Tesla’s diagnostic port is done at your own risk. Exercise caution and consult reputable sources for guidance. Improper use could lead to vehicle damage. Always inspect the cable for any damage before use. This guide provides informational instructions only and does not constitute professional advice.