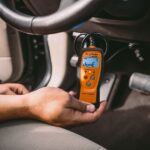
The NEXPEAK NX501 OBD2 scanner is a powerful diagnostic tool that helps car owners and mechanics identify and troubleshoot vehicle problems. This guide provides a step-by-step walkthrough on how to use the NX501, covering its features, functions, and vehicle compatibility.
Understanding the NX501 OBD2 Scanner
The NX501 boasts several key features, including:
- Wide Vehicle Compatibility: Works with most OBD2-compliant gasoline and diesel vehicles manufactured after specific years (see compatibility list below).
- One-Click I/M Readiness: Quickly checks emission readiness status and drive cycle verification.
- Diagnostic Trouble Codes (DTCs): Reads and clears generic and manufacturer-specific error codes.
- Live Data Stream: Displays real-time sensor data in text and graph modes, enabling you to monitor various vehicle parameters.
- Freeze Frame Data: Captures vehicle data at the moment a fault code is triggered.
- O2 Sensor and EVAP System Tests: Performs tests on these critical emission control components.
- Battery Voltage Monitoring: Tracks battery voltage in real-time during diagnostics.
- Built-in DTC Lookup Library: Provides detailed code definitions for easier troubleshooting.
- Internet Updateable: Ensures the device stays current with the latest software and vehicle definitions.
Using the NX501: A Step-by-Step Guide
-
Locate the OBD2 Port: The OBD2 port is typically located under the dashboard on the driver’s side, often near the steering column. It’s a 16-pin trapezoidal connector.
-
Connect the Scanner: Plug the NX501’s connector into the OBD2 port.
-
Turn on the Ignition: Turn the ignition key to the “On” position without starting the engine. This powers up the scanner and allows it to communicate with the vehicle’s computer.
-
Select Language and Vehicle Information: Follow the on-screen prompts to choose your preferred language and input vehicle information if required.
-
Read Codes: Select the “Read Codes” option to retrieve any stored Diagnostic Trouble Codes (DTCs). The scanner will display the codes and their definitions.
-
View Live Data: Choose “Live Data” to monitor real-time sensor readings. You can select specific parameters or view a comprehensive list. This data helps pinpoint the source of issues.
-
Clear Codes: After addressing the problem, select “Clear Codes” to erase the DTCs from the vehicle’s memory. Make sure to address the underlying issue before clearing codes.
-
Additional Functions: Explore the NX501’s other functionalities, such as I/M Readiness, Freeze Frame Data, O2 Sensor Test, and EVAP System Test, as needed for more in-depth diagnostics.
NEXPEAK NX501 Vehicle Compatibility
The NX501 is compatible with a wide range of vehicles, adhering to OBDII protocols.
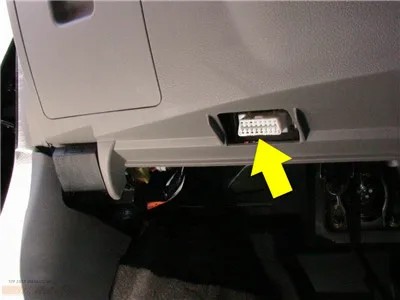 OBD2 16-pin diagnostic port
- American Vehicles (including Brazil): OBD2 compliant vehicles from 2000 onwards (Chrysler, Ford, GM, Jeep).
- European Vehicles: OBD2 compliant vehicles from 2003 onwards (Alfa Romeo, Saab, Acura, Opel, Audi, Seat, Peugeot, Renault, Bentley, Skoda, Daewoo, Benz, Daihatsu, Land Rover, BMW, Vauxhall, Citroen, Volvo, Fiat, VW, Ford, Jaguar).
- Asian Vehicles (including Australia): Japanese vehicles – OBD2 compliant from 2006 onwards (Kia, Isuzu, Honda, Mitsubishi, Hyundai, Dacia, Lexus, Mazda, Nissan, Subaru, Suzuki, Toyota); Chinese vehicles – OBD2 compliant from 2011 onwards (BYD, Chery, Geely, Great Wall, Karry).
- Russian Vehicles: Specific Ssangyong models (Actyon, Korando, Kyron, Rexton) from specific years. Consult the user manual for a complete list of compatible Russian models.
Conclusion
The NEXPEAK NX501 is a user-friendly and powerful OBD2 scanner suitable for both DIY enthusiasts and professional mechanics. By following this guide, you can effectively utilize the NX501 to diagnose and resolve car problems, saving time and money on repairs. Always refer to your vehicle’s repair manual for specific diagnostic procedures and information.