
Connecting your vehicle to a smartphone or tablet for diagnostics is easy with an OBD2 WiFi adapter. This guide provides a step-by-step process to establish a successful connection.
First, ensure you have an OBD2 ELM327 adapter with WiFi capability. Plug it into your car’s OBDII port, usually located under the dashboard on the driver’s side. Turn the ignition on or start the engine. If your adapter has a power button, press it.
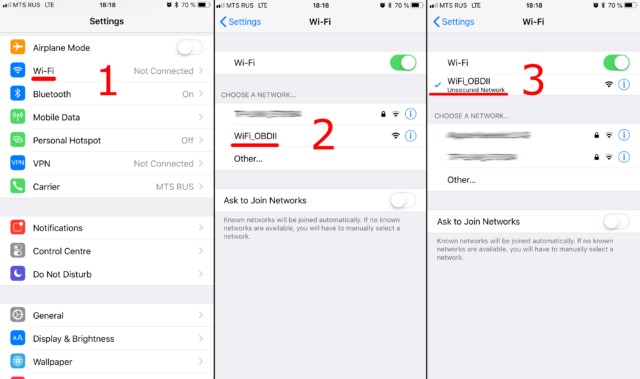
Connecting to the OBD2 WiFi Network
Step 1: Enable WiFi and Connect to the Adapter
Open your phone or tablet’s WiFi settings and enable WiFi. Locate the network broadcasted by your OBD2 adapter. Common names include “OBDII,” “OBD2,” “WIFI_OBDII,” or a name related to the adapter brand (e.g., “VLINK” for VGate adapters). Most adapters don’t require a password, but consult your adapter’s documentation if one is needed. Remember, the network name will not be your car’s brand name.
Step 2: Configure Car Scanner App
Open the Car Scanner app (or your preferred OBD2 software) and navigate to Settings. This is usually a gear icon.
Tap on “Adapter” (or “Connection” in older app versions).
Choose “Wi-Fi” as the connection type.
Verify the adapter’s IP address and port. The default for most adapters is 192.168.0.10 for the IP address and 35000 for the port. However, this can vary; check your adapter’s documentation for specific settings.
Finally, tap the “Connect” button.
For future connections, ensure you’re connected to the OBD2 WiFi network and simply tap “Connect” in the app. You are now ready to use your OBD2 software to diagnose your vehicle.