Connecting your laptop to your car’s OBD2 port opens a world of diagnostic possibilities. This comprehensive guide provides a clear, step-by-step process to establish that connection using a Bluetooth OBD2 adapter and Windows.
Enabling Bluetooth and Locating the OBD2 Port
Step 1: Enable Bluetooth on Your Laptop. Ensure your laptop’s Bluetooth is enabled. If using a USB Bluetooth adapter, install the necessary drivers. For built-in Bluetooth, refer to your laptop’s manual.
Step 2: Locate Your Car’s OBD2 Port. The OBD2 port is typically located under the dashboard, often near the steering column. It might be hidden behind a plastic cover or in the ashtray/coin tray area.
Connecting the OBD2 Adapter
Step 3: Plug the OBD2 Adapter into the Port. Gently but firmly insert the Bluetooth OBD2 adapter into the OBD2 port. The adapter’s power LED should illuminate, indicating a successful connection. For Wi-Fi models, the Wi-Fi indicator will blink.
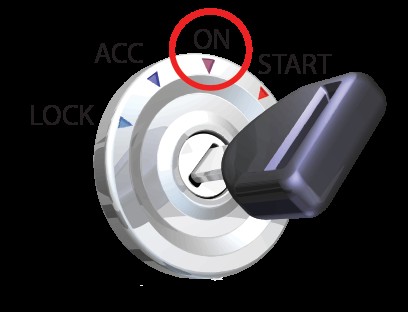
Step 4: Turn Your Car’s Ignition to ‘ON’. This activates the OBD2 system without starting the engine. The ‘ON’ position is often marked with the Roman numeral ‘II’.
Pairing the Adapter with Your Laptop
Step 5: Make the OBD2 Adapter Discoverable. Press the ‘Connect’ button on your adapter. The Bluetooth light should start flashing rapidly, indicating it’s ready for pairing. You typically have about two minutes to complete the pairing process.
Step 6: Pair the Adapter with Windows. Right-click the Bluetooth icon in the Windows system tray and select “Add a Device.” Windows will search for available devices.
Select your OBD2 adapter (e.g., “OBDLink”) and click “Next.” You may be prompted to enter a pairing code. If so, try “1234” or “0000”, or refer to your adapter’s documentation.
Windows will confirm a successful installation. If unsuccessful, repeat the pairing process.
Installing and Setting Up OBD Software
Step 7: Install OBD Software. Download and install reliable OBD software like OBDwiz or FORScan. Ensure your vehicle’s ignition is still in the ‘ON’ position.
Step 8: Configure the Software. Open the OBD software and use the “Auto Detect” feature. This automatically configures the software to communicate with your OBD2 adapter.
Connecting to Your Vehicle’s Data
Step 9: Connect to Your Vehicle. Click the “Connect” button in your OBD software. The software will automatically detect your vehicle’s communication protocol.
Choose the ECU (Electronic Control Unit) with the most supported PIDs (Parameter IDs) to access the widest range of data.
Step 10: Access and Interpret Data. Your OBD software now provides access to various diagnostic information, including trouble codes, real-time sensor data, emissions readiness, and more.
By following these steps, you can successfully connect your laptop to your car’s OBD2 port, unlocking valuable diagnostic data and insights into your vehicle’s performance. Remember to consult your specific adapter and software documentation for any variations in the process.