Understanding your Honda’s OBD2 O2 sensor wiring is crucial for diagnosing and fixing engine issues. This comprehensive guide covers various Honda engine swap scenarios and their corresponding O2 sensor wiring configurations. Whether you’re swapping an OBD1 engine into an OBD2 car or dealing with a specific Honda model like the Civic, this guide will help you navigate the complexities of O2 sensor wiring.
Decoding Honda OBD2 O2 Sensor Wiring
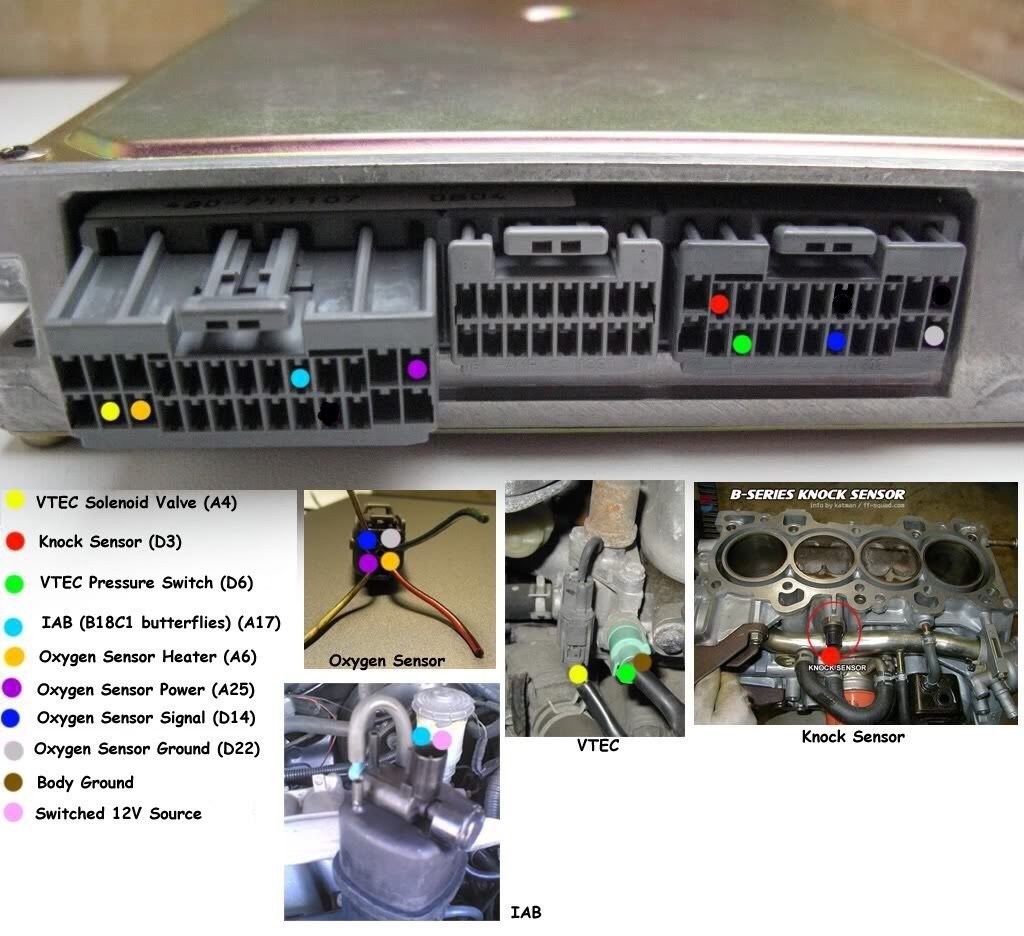
Oxygen sensors play a vital role in maintaining optimal engine performance and fuel efficiency. They measure the oxygen content in the exhaust gases and relay this information to the Engine Control Unit (ECU). The ECU then adjusts the air-fuel mixture accordingly. When modifying your Honda, understanding O2 sensor wiring becomes paramount for a successful engine swap. This guide focuses on the wiring differences between different Honda models and engine generations, specifically regarding O2 sensors.
OBD1 Engine/ECU in OBD1 Civic: O2 Sensor Considerations
For 92-00 Civic models with B and D series engines, specific wiring adjustments are often necessary. In 92 Civics, the VTEC system is already integrated into the shock tower to ECU harness. Using a 92-95 EX/SI engine harness simplifies VTEC integration, making it plug-and-play (See Figure 5). However, when using a P28 ECU with a D16Z6 or a JDM D15B engine, you may need to add a VTEC pressure switch (See Figure 2). Furthermore, CX models with a 1-wire O2 sensor will require wiring in the three additional connections for a 4-wire O2 sensor (See Figure 1). VX models often require converting a 7-wire O2 sensor to a 4-wire configuration.
OBD2 Engine/OBD1 ECU in OBD1 Vehicle: O2 Sensor Wiring
Swapping an OBD2 engine into an OBD1 vehicle presents unique challenges. For D16Y8 engines with a P28 ECU, the knock sensor is not utilized. Relocating the Intake Air Temperature (IAT) sensor to the intake arm is necessary (See Figure 3). Reusing injectors and alternators from the original OBD1 engine is often recommended for compatibility. Additionally, the Crankshaft Fluctuation (CKF) sensor on the OBD2 engine is not used. For B series engines like the B16A2, similar modifications apply.
OBD2 Engine/ECU in OBD2 Vehicle: O2 Sensor Wiring
Swapping engines within the OBD2 generation requires attention to specific details. Using a P2P ECU with a D16Y8 engine in a DX/LX/CX model necessitates wiring the VTEC solenoid, pressure switch, and knock sensor (See Figure 6 & 7 for OBD2A and OBD2B respectively). The idle air control valve also needs modification. For B series swaps, similar procedures apply, including potential IAT relocation (See Figure 8) and IAB wiring for B18C1 engines.
OBD0 to OBD1 and OBD1 to OBD2: O2 Sensor Wiring Adaptations
Swapping between OBD generations requires more extensive modifications. When using an OBD0 B18A engine with a P75 ECU in an OBD1 car, adjustments to the fan switch, O2 sensor wiring, and potentially injectors are required (See Figure 4). Conversely, using an OBD1 D16Z6 with a P28 in an OBD2 vehicle necessitates wiring modifications to VTEC, IACV, and IAT (See Figures 1, 6, 7, 8 and 9). Eliminating components like CKF, EVAP purge, and secondary O2 sensor is often necessary.
Conclusion
Successfully navigating Honda Obd2 O2 Sensor Wiring requires a thorough understanding of the specific engine and ECU combinations involved. This guide provides a foundational understanding of the common wiring challenges encountered during Honda engine swaps. Consulting detailed wiring diagrams (Figures 1-11) specific to your application is highly recommended for a successful and trouble-free engine swap. Always double-check your work and consult with experienced Honda technicians if needed.