
Connecting your ELM327 OBD2 WiFi adapter can seem daunting, but with this comprehensive guide, you’ll be up and running in no time. Follow these simple steps to successfully connect your adapter and start diagnosing your car.
Connecting Your ELM327 OBD2 Adapter
First, ensure your car’s ignition is on or the engine is running. Plug the ELM327 adapter into your vehicle’s OBDII port, usually located under the dashboard on the driver’s side. If your adapter has a power button, press it.
Step 1: Connecting to the Adapter’s WiFi Network
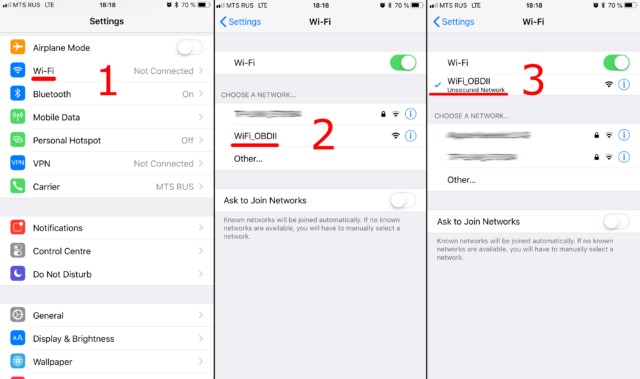
Go to your phone or tablet’s WiFi settings and enable WiFi. Look for the network broadcasted by your ELM327 adapter. Common names include “OBDII,” “OBD2,” “WIFI_OBDII,” or a name related to the adapter’s brand (e.g., “VLINK” for VGate adapters).
Most adapters don’t require a WiFi password. Consult your adapter’s documentation if one is needed. Note: The network name will not be your car’s brand name.
Step 2: Configuring the Car Scanner App
Open your Car Scanner app and navigate to Settings (gear icon).
Select “Adapter” (or “Connection” in older versions).
Choose “Wi-Fi” as the connection type.
Verify the adapter’s IP address and port. The default is usually 192.168.0.10 for the IP address and 35000 for the port. Refer to your adapter’s documentation for specific settings if different.
Step 3: Establishing Connection
Tap the “Connect” button.
For future connections, ensure you’re connected to the adapter’s WiFi network and simply press “Connect.”
Conclusion
By following this Elm327 Obd2 Wifi Manual, you can quickly and easily connect your adapter to your car and begin using diagnostic software. Ensure you have your adapter’s documentation handy for specific IP address and port settings if the defaults don’t work. Enjoy accessing your vehicle’s data!