The Kenwood Excelon DMX905S offers a comprehensive infotainment upgrade with features like Apple CarPlay, Android Auto, and dual camera inputs. This guide outlines the installation process, focusing on integrating the DMX905S into a vehicle, leveraging its OBD2 capabilities. This installation will also utilize a Maestro ADS-MRR interface for seamless steering wheel control retention and vehicle data display.
Preparing for the DMX905S Installation
Before diving into the installation, gathering the necessary components and preparing the vehicle is crucial. This includes removing existing aftermarket equipment, such as the Beat-Sonic CS6EP, and restoring the factory USB input. The DMX905S’s dual camera inputs and on-demand functionality offer a significant upgrade over single-camera systems.
Key components for a successful DMX905S installation include:
- Kenwood Excelon DMX905S: The core infotainment unit.
- Maestro ADS-MRR: This module enables steering wheel control retention and displays vehicle information on the DMX905S screen.
- Maestro HRN-RR-TO2: Harness required for proper integration with Toyota vehicles.
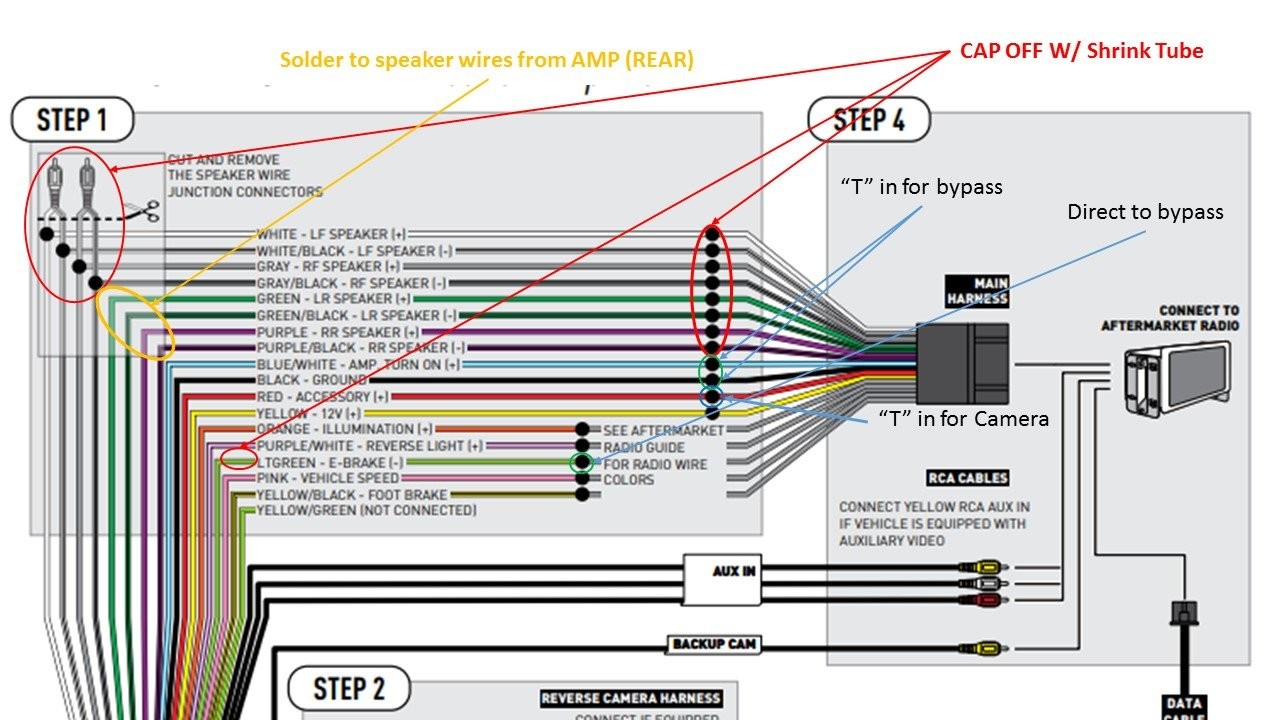
- E-Brake Bypass: Allows full functionality of certain features while the vehicle is in motion. Note: Always prioritize safe driving practices and adhere to local laws regarding video playback while driving.
- Stinger RCA Cables: High-quality RCA cables for audio signal transmission.
- Metra 40-LX11 Antenna Adapter: Ensures proper connection to the vehicle’s antenna.
- Speaker Wire & Remote Turn-On Wire: Required for connecting aftermarket amplifiers and speakers.
- Soldering Supplies: Essential for creating custom wiring harnesses.
Integrating the Maestro ADS-MRR
The Maestro ADS-MRR is essential for retaining steering wheel controls and accessing vehicle data through the DMX905S. This module translates the vehicle’s CAN bus signals into commands the DMX905S can understand. Connecting the Maestro to the DMX905S requires careful wiring and configuration using the provided instructions and software.
Wiring the Rear Speakers and Amplifier
Existing aftermarket amplifiers, like the Arc Audio xDI 850.5, can be integrated with the DMX905S. This may involve soldering new speaker wires from the amplifier to the Maestro harness to maintain the use of factory speaker wiring.
Using a distortion detector, such as the Steven Meade Designs DD-1, ensures accurate amplifier gain settings, optimizing sound quality and preventing speaker damage.
Completing the DMX905S Installation
The final steps involve connecting all components, securing wiring harnesses, and ensuring proper grounding. Double-checking all connections and meticulously routing wires will prevent issues and ensure a clean installation. After completing the physical installation, configuring the DMX905S and Maestro ADS-MRR through their respective interfaces is critical to ensure optimal performance and functionality. This often involves updating firmware and customizing settings to match the vehicle’s specific make and model.
Conclusion
Installing the Kenwood Excelon DMX905S with OBD2 integration offers a substantial upgrade to a vehicle’s infotainment system. Proper planning, meticulous wiring, and careful configuration are crucial for a successful installation. Utilizing the Maestro ADS-MRR unlocks the full potential of the DMX905S, seamlessly integrating with the vehicle’s existing systems and providing a user-friendly experience.