
This guide provides a detailed walkthrough for replacing the timing chain components on a MKIV 12v VR6 engine, specifically focusing on the AAA engine code and its OBD2 implications. While VW considers these chains “lifetime” components, guides and tensioners can fail, potentially leading to catastrophic engine damage. This guide, originally created by VW Vortex moderator Gary Thompson, Ph.D. ([email protected]), offers a more comprehensive approach than even Bentley manuals.
Understanding the Aaa Vr6 Obd2 Chain System
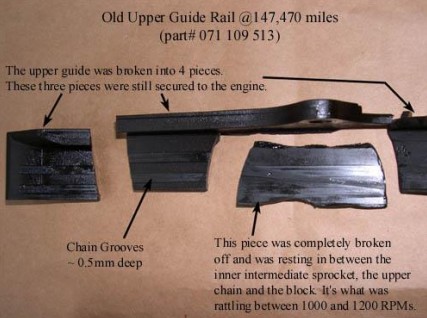
The VR6 utilizes a dual-chain system: an upper chain connecting the camshafts to an intermediate shaft and a lower chain linking a second intermediate shaft to the crankshaft. A critical aspect of the AAA VR6 is the two versions of the upper timing chain setup. Engines with production number 217000 and earlier use a double-row chain and a two-piece tensioner prone to wear. Engines with number 217001 and later feature a more robust single-row chain and a redesigned tensioner. This distinction is crucial for ordering correct replacement parts. A rattling noise from the driver’s side of the engine, often described as “marbles in a can,” between 1000-1200 RPM, often indicates failing chain components.
Identifying Your AAA VR6 Timing Chain Setup
Before starting, determine your engine’s production number to identify the correct upper chain setup. This number dictates which parts you’ll need. Refer to this thread for locating the engine production number: [THREAD LINK – Please insert actual thread link here if available from the original post or research].
Required Tools and Parts for AAA VR6 OBD2 Chain Replacement
Tools:
- 10mm, 13mm, 15mm, and 27mm sockets/wrenches
- 5mm and 6mm hex sockets/wrenches
- Spark plug socket
- Large flathead screwdriver
- Torque wrench (89 in-lbs to 74 ft-lbs range)
- VW camshaft locking tool (#3268) or 1/8″ metal/plastic plate
- RTV sealant (ultra-grey, sensor-safe)
- Wood pieces for rear main oil seal replacement
- Container for oil
Parts (AAA VR6 with newer style upper timing chain – adjust based on your engine’s production number):
- Upper Timing Chain: 021 109 503 D
- Upper Guide Rail: 071 109 513
- Upper Tensioner Rail: 021 109 509 E
- Upper Tensioner Bolt: 021 109 507 B (includes crush washer)
- Lower Timing Chain: 021 109 465 B
- Lower Guide Rail: 021 109 469
- Lower Tensioner Rail: 021 109 467
- Rear Main Oil Seal: 068 198 171
Step-by-Step AAA VR6 OBD2 Chain Replacement Procedure
This procedure assumes prerequisite components (transmission, clutch, flywheel, intake manifold, etc.) are already removed.
-
Preparation: Disconnect fuel lines, knock sensor wire, and remove the valve cover.
-
Setting TDC: Rotate the crankshaft clockwise to Cylinder #1 Top Dead Center (TDC), aligning the notch on the crankshaft pulley with the timing mark on the block. Verify camshaft alignment using the groove on the camshaft end.
-
Locking Camshafts: Insert the camshaft locking tool to prevent rotation.
-
Removing Components: Remove the upper tensioner bolt, upper and lower timing chain covers (carefully preserving the head gasket), guide rails, tensioner units, and chains. Note the specific instructions regarding potential EGR system components for earlier VR6 engines.
-
Cleaning: Thoroughly clean all mating surfaces.
-
Installing New Lower Chain Components: Install the new lower guide rail, chain, and tensioner unit, ensuring proper alignment of timing marks on the crankshaft and intermediate shaft sprockets.
-
Installing New Upper Chain Components: Install the new upper tensioner rail, guide rail, chain, and outer intermediate sprocket. Torque the intermediate shaft bolt while counterholding the crankshaft. Pay careful attention to the detailed instructions regarding potential interference from the thermostat housing on earlier models.
-
Timing Verification: Temporarily reinstall the upper timing chain cover and tensioner bolt. Rotate the crankshaft two full rotations, realign to TDC, and verify camshaft locking tool insertion.
-
Rear Main Seal Replacement (Optional): With the lower cover off, consider replacing the rear main oil seal. Detailed instructions are provided in the original document for this process.
-
Final Assembly: Bleed the new upper tensioner bolt, apply RTV sealant to mating surfaces, reinstall timing chain covers, and torque all bolts to specification. Reinstall the valve cover, spark plugs, and reconnect any disconnected components.
Post-Installation Considerations
After completing the replacement, start the engine and listen for any unusual noises. Double-check for leaks. This comprehensive guide, combined with careful execution, will ensure a successful AAA VR6 OBD2 timing chain replacement. Remember to consult the original document for specific torque values and detailed images for each step.