
The Tesla Model 3, despite its advanced technology, still utilizes an OBD2 port for diagnostics. While not a standard OBD2 port, accessing the Model 3’s proprietary diagnostic connector allows for in-depth vehicle data analysis using specific tools. This guide provides a detailed walkthrough on locating and connecting to the 24 Model 3 Obd2 Port equivalent.
Accessing the Tesla Model 3 Diagnostic Port
Before attempting to connect any diagnostic equipment, ensure the Model 3 is completely powered off. This shutdown process can take up to 15 minutes and must be initiated from the car’s main touchscreen. Failure to do so could result in system errors or potential damage to the vehicle.
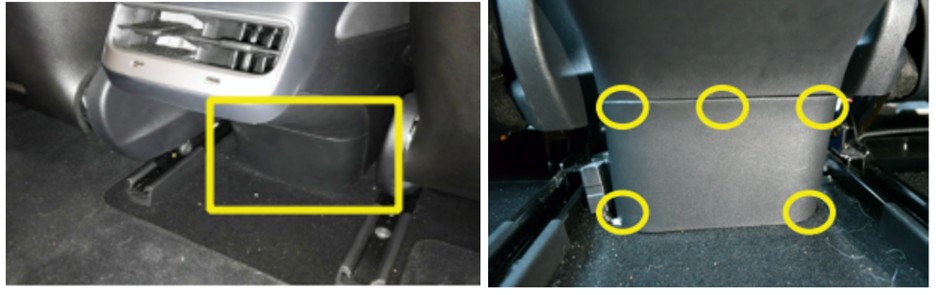
The diagnostic connector isn’t readily visible. It’s tucked away beneath the rear center console air vents, accessible from the rear passenger compartment.
Steps to access the connector:
-
Maximize Front Seat Space: Slide both front seats forward to their fullest extent to allow easier access to the rear of the center console.
-
Locate and Remove the Rear Console Panel: A small plastic panel sits at the base of the center console, between the front seats. This panel is secured by five push-fit clips. Carefully apply pressure to release these clips. You should be able to remove the panel by hand without requiring any tools.
-
Release the Right-Side Clips: If the panel is stubborn, use a small Allen wrench or L-shaped screwdriver. Insert the short end of the tool beneath the panel’s right edge. Rotate the tool vertically and gently pull towards you, parallel to the floor. This should release the bottom right clip.
-
Detach the Panel: With the initial clip released, use your hands to pull the panel towards you, freeing the remaining clips.
-
Connect to the Diagnostic Port: Inside the compartment, you’ll find the white Tesla Proprietary Diagnostic Connector. Press the retaining clip and slide it to the left to unlock the connector. Connect the appropriate diagnostic cable, ensuring a secure connection.
Necessary Equipment
Accessing and utilizing the 24 Model 3’s diagnostic capabilities requires specific equipment:
- Tesla Model 3 Diagnostic Cable: This specialized cable adapts the proprietary connector to a format compatible with OBD2 diagnostic tools.
- OBD2 Dongle: A compatible OBD2 dongle, such as the OBDLink, is necessary to interface with diagnostic software.
- Diagnostic Software: Software like Scan My Tesla or TM-Spy allows you to read and interpret the vehicle data retrieved through the diagnostic port.
Important Disclaimer
Connecting any equipment to your Tesla’s diagnostic port is done at your own risk. Ensure you understand the process and use caution. Improper use could lead to vehicle damage. Always inspect the diagnostic cable for any signs of damage before each use. Remember, this cable acts as an adapter, enabling data reading via the car’s CAN bus signals and providing power to the OBD2 dongle.