
For car enthusiasts and DIY mechanics, maintaining your vehicle at home can be both a rewarding and cost-effective experience. Among the essential maintenance tasks, wheel alignment is crucial for ensuring optimal tire wear, fuel efficiency, and vehicle handling. While professional alignment services are readily available, the cost can add up, and the convenience of performing this task in your own garage is undeniable. This guide explores how you can achieve accurate 4-wheel alignment for passenger cars using readily available tools and a simplified, stringless method, essentially making any standard handyman toolkit into the Best Portable Wheel Alignment Tool For Passenger Cars. This approach, refined over years of practical application, demonstrates that you don’t need expensive, specialized equipment to achieve professional-level results in your home garage.
The Stringless DIY Wheel Alignment Method: Achieve Precision at Home
Traditional string methods for wheel alignment, while effective, can be cumbersome and time-consuming. This guide introduces a streamlined, stringless approach that leverages laser technology for enhanced accuracy and ease of use. This method, developed and tested over a decade, focuses on measuring toe and camber adjustments with simple, homemade tools. The total investment for this setup is remarkably low, often under $50, proving that achieving precise wheel alignment is within reach for any DIYer. The following sections detail the tools, setup, and step-by-step process for performing a 4-wheel alignment using this innovative technique.
Building Your DIY Wheel Alignment Tools
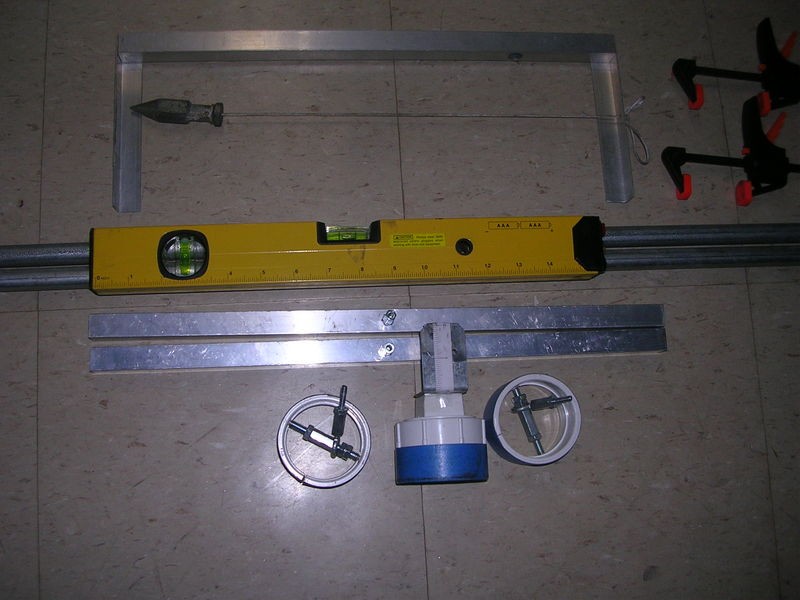
The beauty of this method lies in its simplicity and affordability. The core components are constructed from common hardware store materials, showcasing how ingenuity can replace expensive equipment. Key to this system is a custom-built aluminum bar that mounts to the wheel, providing a stable and level platform for measurement.
This bar serves as the foundation for accurate toe readings, ensuring consistent and reliable data collection throughout the alignment process. Coupled with this bar is a leveling tool equipped with a laser beam, the heart of the stringless system.
This laser tool projects a straight line, far more precise than physical strings, enabling accurate measurements of wheel angles. These tools, simple in design yet effective in function, underscore the accessibility of DIY wheel alignment.
Measuring Toe: Step-by-Step Laser Precision
Toe measurement is a critical aspect of wheel alignment, affecting tire wear and straight-line stability. This DIY method utilizes the laser leveling tool and the aluminum mounting bar to obtain precise toe readings for each wheel.
Setting Up for Toe Measurement
To begin, securely install the aluminum bar onto the wheel you intend to measure. Centering and leveling this bar is paramount for data accuracy. Take your time to ensure it is properly positioned.
Next, attach the laser leveling tool to the mounted aluminum bar. Align the laser beam with the bar, and switch it on to establish your initial reference point. For this demonstration, we’ll start with the rear passenger wheel’s toe measurement.
Utilizing the Distance Gauge for Accurate Readings
The projected laser beam acts as your stringless reference, creating a perfectly straight line for measurement. A key component of this system is the “distance gauge,” a simple yet ingenious tool for measuring the laser’s position relative to the hub.
This gauge measures the distance of the laser beam from the mounting base of the hub, denoted as Xp-f (passenger-front) for the initial reading. Subsequent measurements for other wheels will follow the same naming convention: Xp-r (passenger-rear), Xd-f (driver-front), and Xd-r (driver-rear). These measurements are crucial for calculating toe angles.
Completing Toe Measurement for Each Wheel
After obtaining the initial reading (Xp-f), reposition the laser setup to measure the rearward projection of the beam. This involves adjusting the laser tool and using measuring rods with marked tape to capture the beam’s position at the front and rear.
By comparing the front and rear measurements from the laser projections, you can determine the toe angle for each wheel. Repeat this process for all four wheels, meticulously recording each measurement.
Calculating Toe Values: An Example
Let’s illustrate toe calculation with example data from a rear-wheel measurement:
PS-rear:
- Xp-r = 15/16
- Front rod reading = 0
- Rear rod reading = 0
DS-rear:
- Xd-r = 15.5/16
- Front rod reading = 4-6/16″
- Rear rod reading = 4-9/16″
Ideally, Xp-r and Xd-r should be equal, or very close. In this example, they are similar enough for practical purposes. The difference between the front and rear readings on the driver’s side rear wheel indicates toe-in. Specifically, the difference is -3/16″ (-0.1875″).
To calculate the toe angle in degrees, we use trigonometry:
Tangent(theta) = Toe difference / (2 * Distance between measuring rods)
Using a distance of 17 feet (204 inches):
Tangent(theta) = -0.1875 / (2 * 204) = 0.00046
Theta (angle) ≈ -0.026 degrees (toe-in)
Repeat this calculation for all wheels to determine the toe values.
Measuring Camber: Simple Tools for Accurate Angles
Camber, the vertical tilt of the wheels, is another essential alignment parameter. While specialized digital camber gauges exist, this DIY method demonstrates how to achieve accurate camber measurements with a simple, homemade tool.
This McGiver-style camber tool, capable of detecting deflections as small as 1/32″, provides sufficient accuracy for DIY alignment. An accuracy of 1/16″ is generally adequate for detecting changes in camber settings.
By using this tool in conjunction with a level, you can effectively measure the camber angle of each wheel and make necessary adjustments.
Addressing Accuracy Concerns and Achieving Professional Results
A common question regarding DIY wheel alignment is the accuracy compared to professional shops. While professional alignment racks offer sophisticated sensors and software, this stringless laser method, when executed carefully, can yield surprisingly accurate results. The key to accuracy lies in meticulous setup, precise measurements, and a thorough understanding of the alignment principles. By investing time and attention to detail, DIY mechanics can achieve wheel alignment results that are comparable to, or even exceed, those from standard alignment shops, all while utilizing the best portable wheel alignment tool – their own ingenuity and a few affordable tools.
Conclusion: Empowering DIY Wheel Alignment
This stringless laser method empowers DIY enthusiasts to perform accurate 4-wheel alignments at home, saving money and gaining a deeper understanding of their vehicle’s mechanics. By utilizing readily available tools and a methodical approach, achieving professional-level wheel alignment is no longer confined to specialized shops. This DIY guide provides a pathway to mastering wheel alignment, enhancing your car maintenance skills, and ensuring optimal vehicle performance with what can be considered the best portable wheel alignment tool for passenger cars – your own hands and a bit of DIY spirit.