
Stripping paint from your car, whether it’s a small touch-up or a full body restoration, is a crucial step in any automotive project. Choosing the right method is essential for achieving a flawless finish without damaging your vehicle. This guide explores the most effective car paint and rust removal tools and techniques, helping you select the best approach for your specific needs and budget.
From DIY solutions to professional services, we’ll cover a range of methods, evaluating their pros and cons to empower you to make an informed decision. Let’s dive into the world of automotive paint and rust removal and discover the best tools for the job.
Chemical Paint Strippers: Pros and Cons
Chemical paint strippers have long been a popular choice for removing car paint. However, due to evolving environmental and safety regulations, the formulations have changed. Methylene Chloride, a highly effective ingredient, is now restricted, impacting the speed and efficiency of modern chemical strippers.
Despite these changes, chemical strippers still work. They are particularly useful for horizontal surfaces and areas where mechanical methods might be difficult to maneuver. Here’s a look at a popular option:
Around $50/Gallon, plan for at least a gallon, potentially more for a full car stripping project.
While older, stronger formulations like aircraft stripper from Klean-Strip might be tempting, their current versions may not deliver the same performance. It’s advisable to test a smaller quantity first if you opt for these. For more potent strippers containing MEK, consult local automotive paint suppliers as availability may vary by region due to regulations.
How to Use Chemical Paint Stripper Effectively
For optimal results with chemical paint strippers, follow these steps:
- Surface Preparation: Begin by lightly scoring the paint surface with 80-grit sandpaper. This helps the stripper penetrate the paint layers more effectively.
- Protect Sensitive Areas: Use masking tape to carefully seal off seams and gaps to prevent the stripper from seeping into unwanted areas.
- Application on Horizontal Surfaces: Generously pour the chemical stripper onto horizontal panels and immediately cover them with plastic sheeting. This helps to keep the stripper wet and active, enhancing its effectiveness.
- Application on Vertical Surfaces: For vertical surfaces, apply the stripper using a brush. Use a heavy, even coat, brushing in a single direction to ensure consistent coverage.
- Wait for Reaction: Allow the stripper to work for at least 20 minutes, or longer, until bubbling and softening of the paint are complete. Patience is key here, as modern strippers may take longer than older formulations.
- Scrape Off the Paint: Use a metal or plastic scraper to remove the softened paint. For multiple layers, repeat the application process as needed.
- Neutralization: Crucially, neutralize the treated surface with denatured alcohol or soap and water to stop the chemical action and prepare the surface for priming.
- Prime Immediately: Apply epoxy primer on the same day, following the primer manufacturer’s instructions. Most epoxy primers require an 80-grit sanded surface for optimal adhesion.
Important Note: Chemical strippers are not suitable for fiberglass or plastic components. They can damage the gel coat and resin structure of these materials. For these parts, consider mechanical or blasting methods instead.
To maximize the effectiveness of chemical strippers, especially on vertical panels, consider removing doors and other detachable parts to allow for horizontal application. Pouring the chemical in rows and then gently spreading it with a brush ensures an even, thick layer (aim for about 1/8 inch). Avoid excessive brushing, which can disrupt the chemical action.
Often, a combination approach works best. Use chemical stripper to soften the bulk of the paint, then follow up with mechanical methods like a surface conditioning tool or strip-it disc for the remaining stubborn areas. This synergy can significantly speed up the process.
Remember to thoroughly tape up seams, like hood-to-fender seams, to prevent chemical seepage that could compromise your new paint job in the future. Avoid using paint stripper on hemmed door skins or any areas where chemicals could become trapped.
Chemical Stripping: Pros
- Cost-Effective: Chemical strippers are generally inexpensive compared to other methods.
- Minimal Dust: This method produces very little dust, making cleanup easier and safer.
- Easy on Horizontal Surfaces: Application on flat, horizontal areas is straightforward and efficient.
- Gentle on Steel: When used correctly, chemical strippers are gentle on steel car bodies, minimizing the risk of damage.
- No Warping: Unlike some aggressive mechanical methods, chemical stripping does not cause panel warping.
Chemical Stripping: Cons
- Neutralization Required: Proper neutralization is essential to prevent future paint adhesion issues.
- Not Ideal for Seams: Chemicals can seep into and remain in seams if not properly sealed, potentially causing problems later.
- Slower with Modern Formulas: Due to regulations, newer formulations are slower acting than older strippers.
- Damaging to Plastic: Chemical strippers are not safe for plastic car parts.
- Damaging to Fiberglass: Similarly, they are unsuitable for fiberglass components.
Mechanical Paint Removal: Tools and Techniques
For a more hands-on approach, mechanical paint removal offers an effective DIY alternative, especially given the changes in chemical stripper formulations. Recent advancements have introduced tools that are more efficient and less labor-intensive than traditional sanding.
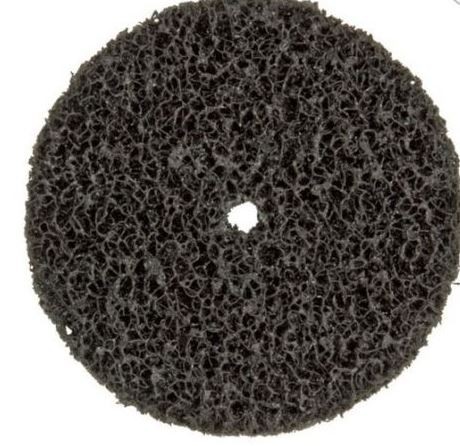
Two standout tools in mechanical paint removal are strip-it discs and surface conditioning tools. These utilize woven abrasive materials that resist clogging and effectively remove paint, body filler (Bondo), and even light surface rust, leaving a clean, paint-ready surface. They prepare the surface to a roughness close to the 80-grit abrasion recommended by most primer manufacturers.
7-Inch Strip-It Discs
These discs excel when used with a low-speed sander, such as a Makita sander with a plastic backing pad. Their larger size covers more area quickly, making them efficient for larger panels.
Surface Conditioning Tools
Specifically designed for automotive paint removal, these tools are versatile and effective for various contours and surfaces. They are generally used with rotary tools or angle grinders.
The cost and availability of woven abrasive materials have become more favorable recently. While larger 7-8 inch discs can sometimes be harder to source, they are available and offer superior coverage. Click here to buy.
Using a standard 4.5-inch angle grinder might cause the woven discs to wear out quickly due to the higher speed. A sander operating around 3000 RPM, like the Makita sander, is a better choice for longevity and control. A single 7-inch disc can potentially strip an entire car if used with moderate pressure, allowing the tool to do the work.
A Makita sander paired with a strip-it disc, ideal for controlled and effective paint removal.
Combining mechanical stripping with chemical methods, as mentioned earlier, can be highly effective. Softening paint with a chemical stripper first, then using mechanical tools to remove the loosened paint, minimizes dust and speeds up the overall process. If the paint becomes dusty rather than peeling off in chunks, it might indicate the need for more chemical stripper application.
One limitation of woven abrasive tools is their reduced effectiveness on undercoating. They tend to clog and become bogged down when used on thick undercoating materials.
Undercoating Removal Techniques
For removing tough undercoating, consider these alternative methods:
- Wire Wheel: Use a wire wheel on a drill or a 4.5-inch angle grinder to aggressively remove undercoating.
- Propane Torch and Scraper: Carefully use a propane torch to soften the undercoating, then scrape it off with a metal scraper. Exercise caution to avoid damaging the underlying metal and ensure proper ventilation.
- Oscillating Slicer Tool: An oscillating slicer tool can be effective for cutting through and removing undercoating.
For a more detailed guide on undercoating removal, click here to read a dedicated article.
Mechanical Stripping: Pros
- Inexpensive: Mechanical tools and abrasives are generally affordable.
- Gentle on Metal: When used correctly, these methods are gentle on metal panels, minimizing warping.
- DIY-Friendly: Mechanical stripping can easily be done at home, potentially even hiring help for labor.
- Safe for Seams: Unlike chemical strippers, mechanical methods are safe to use around seams.
- Primer-Ready Surface: Leaves a surface properly prepared for epoxy primer application.
- Panel-by-Panel Approach: Allows for working on one panel at a time, offering flexibility.
Mechanical Stripping: Cons
- Dusty: Mechanical methods generate significant dust, requiring proper respiratory protection and cleanup.
- Labor-Intensive: Can be physically demanding, especially for large areas or multiple vehicles.
Media Blasting for Car Paint and Rust Removal
For a comprehensive paint and rust removal solution, many car enthusiasts turn to media blasting. Professional media blasters utilize high-volume airflow equipment that is typically not available for home use. For complete vehicle stripping using this method, engaging a professional service is generally recommended. Some businesses offer mobile blasting services, bringing the equipment to your location.
Caution: High-pressure abrasive media can warp large, thin panels like hoods and doors if not handled by an experienced operator. For such panels, consider using chemical or mechanical methods first for the easily accessible areas.
Common Media Blasting Materials
Various media can be used depending on the desired outcome and the material being removed:
- Walnut Shells: A softer media, good for paint removal without aggressively etching the metal.
- Glass Beads: Effective for rust removal and surface refinement.
- Soda (Sodium Bicarbonate): A gentler, water-soluble media that is less likely to warp panels.
- Sand (Various Grits): An aggressive media, best for heavy rust and thick coatings. Use with caution on thin panels.
- Vapor Blasting: A mixture of water and media, reducing dust and potentially warping.
- Dry Ice Blasting: Utilizes frozen carbon dioxide pellets, effectively removing paint and undercoating with minimal residue and no abrasive damage.
The choice of media depends on the paint thickness, panel shape, and the presence of rust. Multiple media types may be used for different stages of a restoration project.
A key advantage of media blasting, especially sandblasting and glass bead blasting, is its effectiveness in removing rust, particularly in hard-to-reach areas. For heavily rusted vehicles undergoing restoration, it’s common practice to cut out severely corroded metal to access and thoroughly clean inner cavities. This is often part of a full rotisserie restoration where components like doors and hoods are removed for comprehensive work.
When cutting out rusted sections, bracing the chassis may be necessary to prevent structural distortion, particularly in full frame-off restorations.
Media Blasting: Pros
- Professional Service Available: Outsourcing to professionals ensures quality and efficiency.
- Excellent for Rust Removal: Media blasting excels at removing rust, even in intricate areas.
- Fast and Efficient: A quick method for stripping large areas or entire vehicles.
- Dry Ice Blasting (Least Intrusive): Dry ice blasting is a less abrasive option, minimizing potential damage and cleanup.
Media Blasting: Cons
- Expensive: Professional media blasting services can be costly, ranging from $2,000 to $3,000 for a full car strip.
- Warping Risk: Improper technique can lead to panel warping, especially with aggressive media and inexperienced operators.
- Messy: Glass, shells, or sand media can spread widely, requiring significant cleanup.
- Logistics: Requires transporting the car to a shop or having ample outdoor space for mobile blasting.
- Soda Neutralization: Soda blasting requires neutralization to remove residue and prevent paint adhesion issues.
Acid Dipping for Complete Paint and Rust Removal
For the most extreme paint and rust removal, acid dipping is an option. This process involves immersing the entire car body in a sequence of chemical baths to strip paint and rust comprehensively.
Acid dipping necessitates complete vehicle disassembly. Everything, including interior, trim, and mechanical components, must be removed from the car body before dipping. It’s also crucial to remove any plugs or seals that might trap air within cavities, preventing the acid solution from reaching all surfaces. Trapped air can hinder the effectiveness of this method.
Acid dipping is strictly a professional service. Thoroughly research and question any service provider to ensure they have the expertise and equipment to perform the process correctly.
Acid dipping is particularly beneficial for heavily rusted vehicles or cars with thin metal, like older Volkswagen Beetles. The acid treatment effectively removes rust, including pitting, cleaning the metal down to bare, corrosion-free condition.
Proper neutralization after acid dipping is paramount. This is typically achieved with high-pressure water rinsing to flush away all chemical residues and debris.
Heating seams after dipping can help to boil out any trapped chemicals from spot-welded areas. Residual chemicals can leach out over time and damage new paint, sometimes years later.
Most dipping facilities apply a phosphate coating after acid treatment to prevent flash rust. Verify that your chosen primer is compatible with phosphated surfaces before application.
Electrolysis for Rust Removal: A Dipping Alternative
Electrolysis offers another dipping-based method, specifically for rust removal. While not using acid, it involves submerging parts in an electrolyte solution and applying an electric current. Electrolysis is ideal for smaller, delicate parts where abrasive methods are undesirable. The process is self-limiting, stopping once the rust is removed, preventing over-treatment.
Acid Dipping: Pros
- Thorough Rust Removal: Acid dipping provides exceptionally thorough rust removal, reaching even hidden areas.
- Quick Process (Once Prepped): Once the car is prepped, the dipping process itself is relatively quick.
- No Warping: Unlike some blasting methods, acid dipping does not cause panel warping.
Acid Dipping: Cons
- Potential for Acid Leaching: Acids can potentially leach from seams over time, damaging future paint.
- Complete Disassembly Required: Requires complete vehicle disassembly, adding significant prep time and labor.
Car Paint Stripping Summary: Choosing the Best Tool
Ultimately, selecting the “Best Paint And Rust Removal Tool For Car” depends on balancing cost, time, and desired quality. High-end restoration shops, focusing on valuable vehicles, often favor dry ice blasting and/or meticulous mechanical methods. Mechanical stripping, while labor-intensive, ensures excellent paint adhesion, making it a top choice where quality and reputation are paramount.
For those overwhelmed by rust repair, outsourcing media blasting can be a worthwhile investment. Many restorers find that having the rust removal professionally handled provides a fresh start and renewed motivation for the project.
For a visual overview and comparison of these methods, watch this video summarizing car paint stripping techniques:
Watch the Car Paint Stripping Methods Video
If you have specific questions about paint and rust removal, please leave a comment below!